
If you want easy to understand notes on the chapter “light“, you will love these amazing notes I am about to share with you.
In fact, these are the exact notes I used to understand this topic easily.
But before starting, the topics we are going to cover are:
- Reflection
- Refraction
- Lenses
- Image formation
And much more!
So let’s start the topic without further introductions.
Light Notes:
In Physics, light is (electromagnetic) radiation that our eyes detect. In simple words, it is something that allows us to see.
To understand more, let’s talk about reflection.
Reflection:
Have you ever looked at yourself in a mirror? Well, that is what reflection is.
Reflection is the “bouncing back” of light from a smooth polished surface. In other words, it is the rebounding of light.
Below are some definitions that you should know when understanding reflection:

- Incident ray: It is a ray of light that strikes at a surface.
- Normal: It is an imaginary line that is perpendicular to the surface reflecting the light.
- Angle of Incidence: The angle that is formed between the incident ray and the normal.
- Reflected Ray: The ray of light that bounces off the reflecting surface.
- Angle of reflection: The angle between the normal and the reflected ray.
When talking about reflection, it is important to discuss the topic: The characteristics of a plane mirror image. So, let me tell you about this.
Characteristics of a Plane Mirror Image:
An image formed by a plane mirror has the following characteristics:
- It is virtual (that cannot be captured on a screen)
- It is erect (upright)
- The size of the image is equal to the size of the object
- It is laterally inverted (an image whose right-hand side is the left-hand side of the object and vice versa
You will understand more about these characteristics when I will tell you how to find the position of an image (formed by a plane mirror).
So let me show you how it is done.
Here is the step-by-step process to draw a ray diagram:
A ray diagram is the representation of the paths light can take to travel. We use ray diagrams to locate the position of the object from an image.
- First of all, draw an incoming ray from the object (towards the mirror).
- Now, draw the normal (perpendicular line) and mark the angle of incidence.
- Since the angle of incidence is equal to the angle of reflection, draw the reflected ray.
- Now, do the same thing again (draw another ray).
- Finally, trace back the lines and the point where they intersect (meet) will give you the image.
With this, it is time to talk about the different types of reflection.
There are two main types of reflection: Regular and diffused.
The regular reflection is clear and sharp such as from a plane mirror. This is because the reflecting surface (such as a mirror) is uniform.
If we talk about the diffused reflection, the angle of reflection is completely random. This is because of the rough surfaces. In simple words, the rays are scattered in different directions rather than just one angle.
Moving on, let’s talk about the refraction of light.
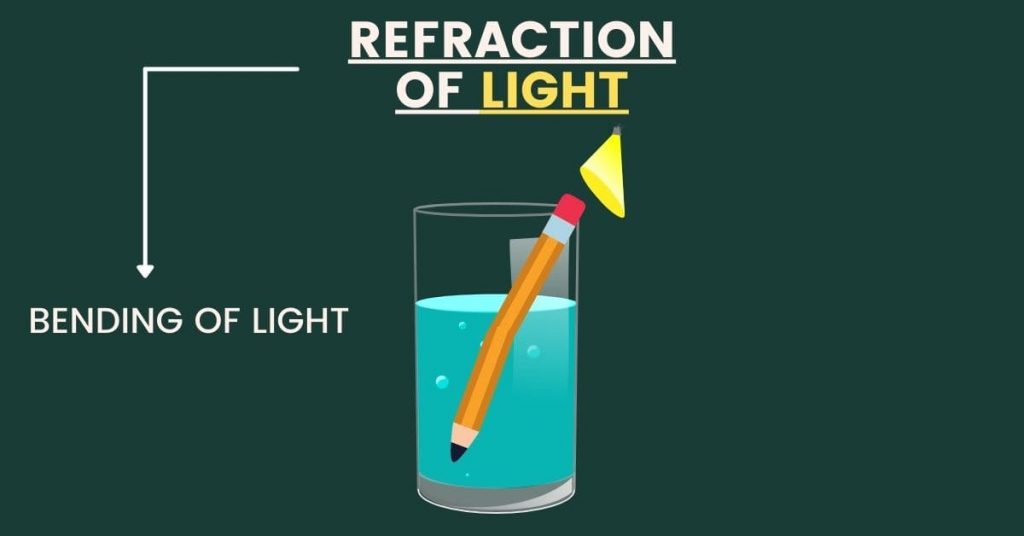
Refraction:
In simple words, refraction is the bending of light (it can also be sound and water) as it travels from one substance to the other. Actually, it is the change in speed that causes this bending.
For example, when the light moves from air to water, it slows down which causes it to bend.
Now, let’s talk about some other important concepts related to refraction.
Further reading:
Deformation Notes | O Level Physics (5054)
Current Electricity | Best Notes
Snell’s Law:
In simple words, snell’s law is a formula to describe the relationship between the angle of incidence and refraction (when the light rays are travelling from one medium to the other).
The equation below shows what this law says:
Sin i / Sin r = constant
When talking about this law, it is also important to discuss what is meant by refractive index?
The refractive index (n) is the measure of the bending of light when it moves from one medium to the other. In simple words, it shows how much the light ray would bend.
In short, here is the formula that we will use for the calculations in future.
refractive index (n) = Sin i / Sin r
But before moving on, I have a question for you to practise to see how the formula mentioned above can be used in calculations.
Question:
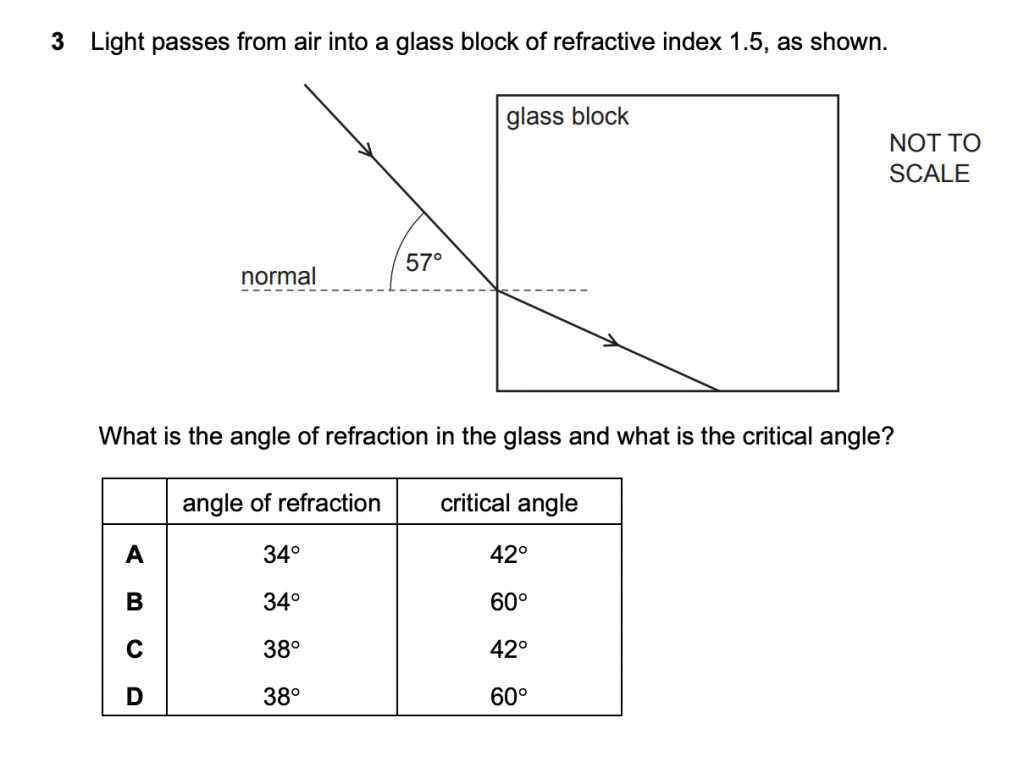
Solution: First of all, recall the formula for refractive index.
From the diagram, we know that the refractive index (n) is 1.5, and the angle of incidence is 57°.
So we can say that:
1.5 = Sin 57 / Sin r
Sin r = Sin 57 / 1.5
r = Sin-1 (Sin 57 / 1.5) = 33.9 = 34
Important Note: Before finding the critical angle, you need to know about the Principle of reversibility. In simple words, if the light moves from a denser (water or glass) to a less dense medium (air), the formula will also be reversed.
Here’s what your formula will look like:
n = Sin r / Sin i
Moving on, we will talk about the critical angle in detail. But for now, you should know that the critical angle is the angle of incidence when the angle of refraction is 90 degrees.
So the critical error will be:
1.5 = Sin 90 / Sin i
Sin i = Sin 90 / 1.5
i = Sin-1 (Sin 90 / 1.5) = 41.8 = 42
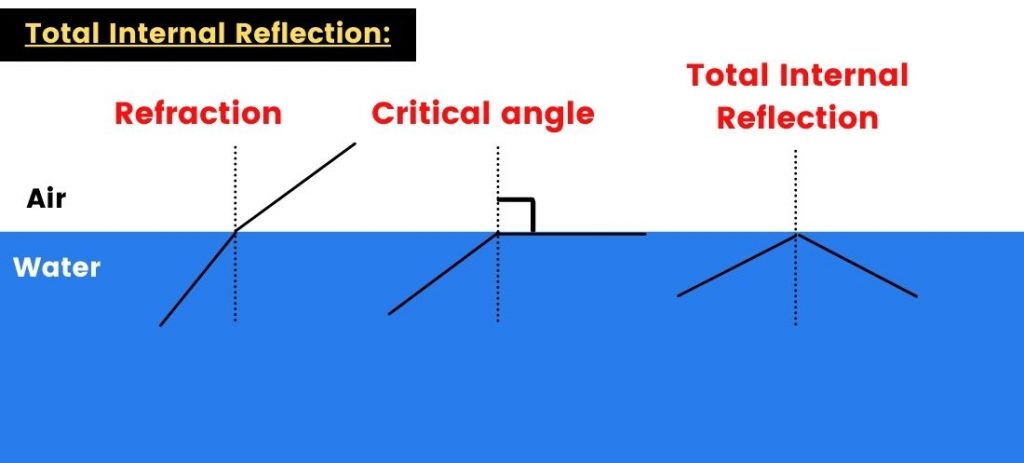
Total Internal Reflection:
In Physics, if the angle of incidence is greater than the so-called critical angle, then the total internal reflection will take place. In this case, the light reflects instead of refracting.
We will understand this topic in detail. But for now, you should know the two requirements for his process to occur:
- Light should travel from a denser (higher refractive index) medium to a less dense medium.
- The angle of incidence should be greater than the critical angle.
The diagram below will help you understand this concept.
So if you are asked to calculate the critical angle, you will use the formula:
Sin c = 1 / n
where c is the critical angle and n is the refractive index.
There are multiple applications of total internal reflection such as in communication, medical use and optical fibres.
You should know about the use of optical fibres in telecommunication as it is very important from an examination point of view.
An optical fibre is a (thin) rod of high-quality glass. When the light enters it, it undergoes total internal reflection. Note that this Principle works even when an optical fibre is bent.
Now you might be wondering, why do we use optical fibres to transmit data?
Well, they transfer data huge amounts of data with minimal loss. Plus, they are cheap and efficient. In short, the advantages of optical fibres are:
- Cheap (cost-effective)
- Lightweight and flexible
- Less signal degradation
- Transmit large amount of data with minimal degradation
Now when you know something about total internal reflection, let’s take about lenses.
Lenses (Converging and Diverging):
A lens (clear glass with curved surfaces) is an optical device that converges (focus) or diverges (disperses) the light due to refraction. As the name suggests, a converging lens focuses light rays on one point.
On the other hand, a diverging lens disperses the rays of light.
Below are some terms that you should know about when learning about lenses.
Principle axis: It is a straight line passing through the optical centre of the lens.
Optical centre: It is the centre point (mid-point) and lies on the Principle axis. Note that if the light passes from this point, it neither converges nor diverges.
Focal point: This is the point where all the rays (parallel to the Principle axis) meet after refraction. You should know that every lens has two focal points (on each side) defined as F and 2F.
Focal length: It is the distance between the optical centre (C), and the focal point (F).
The image formed by the lens depends upon the position of the object from the lens. I have given a table below that will help you remember the type of images formed.
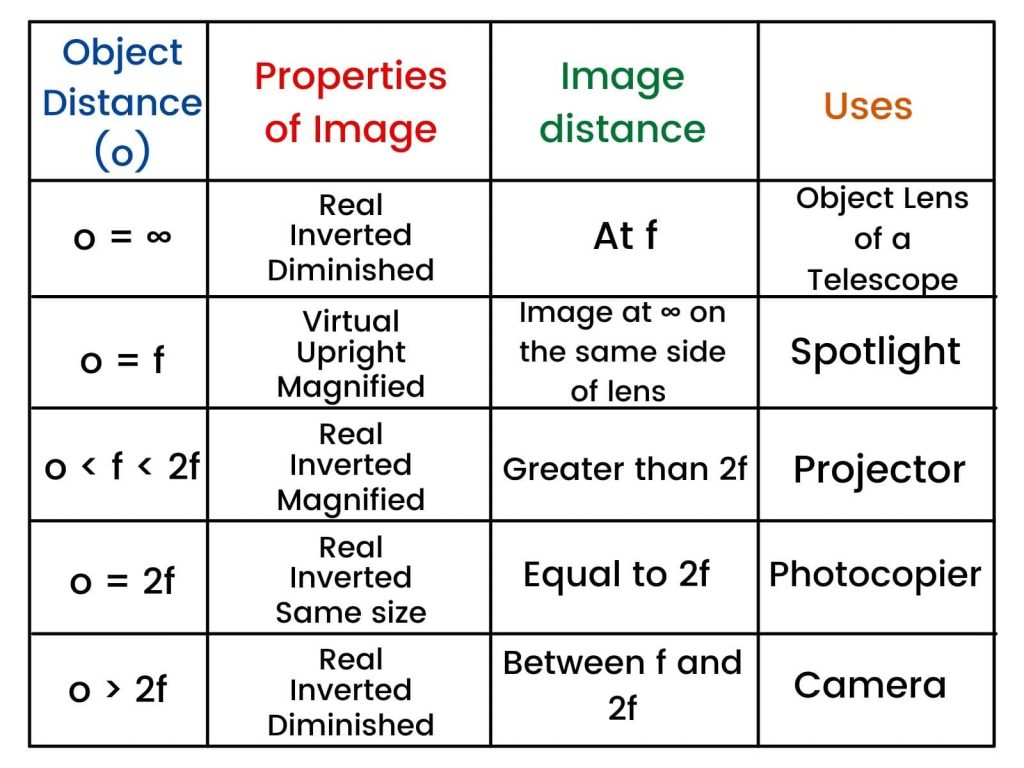
Now, note that we use these lenses as a magnifying glass and in cameras, projectors and photographic enlargers.
Below are some details that may help you understand the above concepts:
Magnifying glass: It is used to make objects look bigger in size. Therefore, the lens is placed at less than f (a focal length) from the object.
Cameras: They use converging lenses to focus an image and even magnify it. However, if we talk about a film camera (specifically), it produces a real, inverted and diminished image.
Projectors: They create images by shining the light through a lens that is refracted. This forms a sharp image that is real, inverted and magnified.
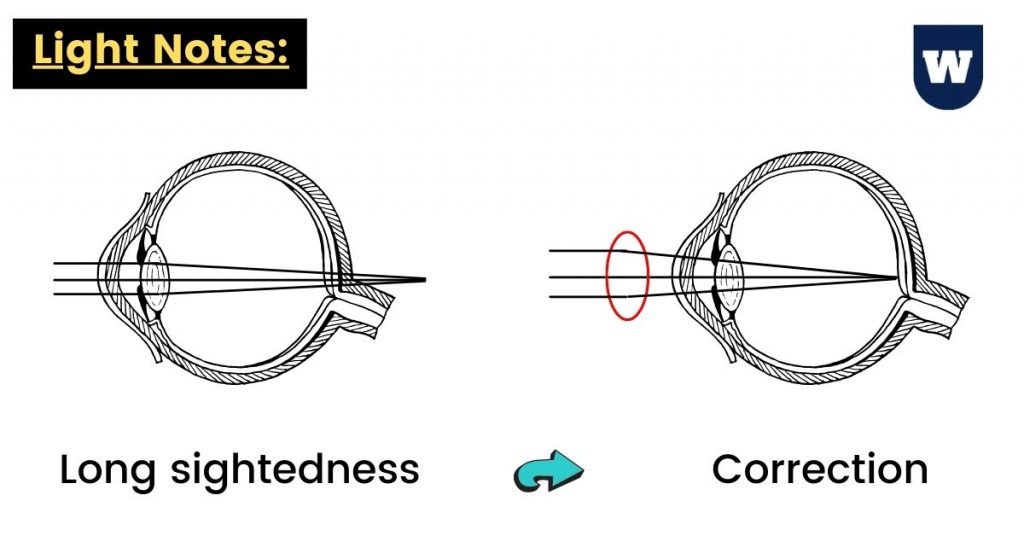
Long and short sightedness:
Note that being long-sighted means that you will not be able to see objects closer to your eye. This is because the lens is unable to focus the rays to produce a clear image.
Therefore, we use a converging lens to focus the light rays on the retina (to produce a sharp image).
On the other hand, short-sightedness is the exact opposite. This is because people who are short-sighted see the objects far away blurry.
We use spectacles with a diverging lens to correct this. So in this way, we use lenses to correct vision as well.
Wrapping up:
Now I turn it over to you.
Which part of this topic “light notes” you find the most interesting. Is it the refraction of light or lenses?
Either way, do let me know.
I recommend you practising past papers for this topic to ace it in your examination. If you have any questions, do let me know. Thank you very much for reading and staying with me till the end.
Finally, the topics covered in this article are reflection, refraction, lenses, short and long-sightedness.